In our Game of the Week, Alex annotates his round 2 game against Eric Beaulieu, a QGA where Alex as Black took some chances to avoid equal but drawish positions, but risked ending up clearly worse.
..
[Event "Pere Noel"]
[Site "Montreal"]
[Date "2016.12.27"]
[Round "2"]
[White "Beaulieu, Eric"]
[Black "Le Siège, Alexandre"]
[Result "0-1"]
[ECO "D22"]
[WhiteElo "2202"]
[BlackElo "2578"]
[Annotator "Alexandre Le Siège"]
[PlyCount "86"]
[EventDate "2016.12.??"]
[EventType "swiss"]
[EventRounds "5"]
[EventCountry "CAN"]
{Eric is part of the wave of players who have returned to the competition
after a long break. He told me he's been studying a lot of Dvoretsky lately
and really likes his book "Maneuvering: The Art of Piece Play". And clearly, he
made use of the late great teacher's lessons, playing some nice positional moves in
this game. It's really a great time to be a student of the game with so much
good literature and the advancement of chess engines.} 1. d4 d5 2. Nf3 {
I don't see a good reason for this move order if White is going to play 3.c4
next. Might as well keep more flexibility.} Nf6 3. c4 dxc4 4. e3 Bg4 {[#] It's
useful to have a second-tier opening repertoire when you need to play for the
win with Black, especially in a crowded open section with only 5 rounds. I
picked up this ...Bg4 system from the book "Understanding The Queen's Gambit
Accepted" by Alexander Delchev and Semko Semkov. Magnus Carlsen used it to
almost defeat Anish Giri in the 2016 Bilbao Masters.} 5. Bxc4 e6 6. O-O (6. Nc3
{is a crafty move order. The idea is revealed after} a6 ({or} 6... Nbd7 7. O-O
Bd6 8. h3 Bh5 9. e4 $1 e5 10. g4 Bg6 11. dxe5 Nxe5 12. Nxe5 Bxe5 13. f4 {
with advantage.}) 7. h3 Bh5 8. g4 Bg6 9. Ne5 Nbd7 10. Nxg6 hxg6 11. Bf1 $1 $14
{To avoid those aforementioned lines, Black is advised to play 6... Nc6!
instead. While committing the knight so early to c6 is not ideal, it's better
once White has committed his own knight to c3.}) 6... a6 {A flexible move.
Black isn't afraid of h3, g4 since the White bishop can't drop back to f1
anymore.} 7. b3 $5 {White shows some flexibility of his own. It's nice to have
the b1 knight able to go to c4 to rule out one of Black's main ideas: ...e6-e5.
} c5 {Reverting back to the normal QGA set-up because I was unhappy with :} (
7... Nbd7 8. Bb2 Bd6 (8... Be7 $5 {follow by c5.}) 9. Nbd2 O-O 10. Be2 Qe7 11.
Nc4 $14) 8. dxc5 $1 {[#] The right decision. White will have a slightly more
pleasant endgame. My opening strategy hasn't been a great success with the
queens coming off the board so early. But I will try to turn the tide next
move with a concept employed by Carlsen in his world championship against
Karjakin.} Nc6 $5 {I am fighting hard for the control of the d-file. The
obvious drawback is that I might have some trouble regaining the c5-pawn. See
game 7 Karjakin vs Carlsen to see this same ...Nc6 concept apply. The only
'minor' difference is that in Carlsen's case it was all preparation.} (8...
Qxd1 9. Rxd1 Bxc5 10. Bb2 Nc6 11. Nbd2 $14) 9. Ba3 $1 {White is justified in
misplacing his bishop since it's not entirely obvious how to regain the pawn.}
(9. Qxd8+ $6 {doesn't look right. And indeed after} Rxd8 10. Ba3 {Black simply
plays} Be7 $1 $11 11. Nbd2 $2 b5 $17) 9... Ne4 $2 {"Don't move the same piece
twice in the opening" applies here.} (9... Qa5 {is well met by} 10. Qd2 $1 $14
{but}) (9... Be7 $1 {with the idea to regain the pawn later gives Black a fair
chance to reach complete equality. Once again we see that general principles
are often the best policy. Getting tactical is often a dangerous commitment.})
10. Nbd2 $2 {I was relieved when Eric played this move. He missed a nice
chance to get a huge advantage with the paradoxal} (10. Qxd8+ Rxd8 11. Nd4 $1
$16 {The powerful threat f3 puts a stop to Black's ambitions; and regaining c5
doesn't solve the problems:} Nxc5 12. Nxc6 bxc6 13. Rc1 $16 {On the other hand}
) (10. Qc2 $2 Bxf3 11. gxf3 Nxc5 $13 {is fine for me.}) 10... Bxc5 11. Bb2 Nxd2
12. Qxd2 Qxd2 (12... Bxf3 13. Qxd8+ Rxd8 14. gxf3 Rd2 15. Bc3 Rc2 16. Rfc1
Rxc1+ 17. Rxc1 Ba3 18. Rd1 Ke7 {is equal as well, but offers less chance to
outplay my opponent.}) 13. Nxd2 O-O 14. Ne4 {[#] This Bg4 is a mixed blessing.
On one hand, I am thrilled to control the d1 square. On the other hand, I am
less thrilled that after Ng3 it's getting in trouble.} Ba7 $6 {Obviously the
best move is the harmonious ...Be7, but playing for a win at all cost I was
trying to force complications. After} (14... Be7 $1 {I didn't like the fact
that White can shut down my bishop with} 15. Ng3 h5 $1 16. f3 h4 17. Ne2 Bf5
18. e4 {It's not such a problem for Black, since I can eventually trade it
with the maneuver ...Bh7-g8, f6, e5, but the resulting positions appeared a
little dry to me. This is a typical plan often employed in the Slav Defense.
See the World Championship match between Kramik vs Topalov for a good example
of how to deal with such a bishop.}) 15. Ng3 (15. Rfc1 $1 $14) 15... h5 $1 {
As unusual as effective.} 16. h3 h4 17. Ne4 (17. hxg4 hxg3 {is no fun for
White with my Ba7.}) 17... Bh5 18. Rfc1 $1 {A very nice positional move. The
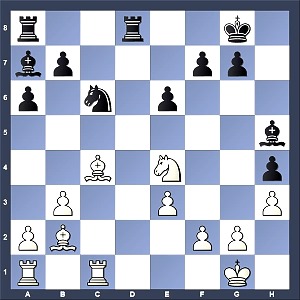
a2 pawn is kept protected and the c4 bishop can drop back to f1.} Rfd8 $5 {
[#] Critical Position Tell you the truth, I missed both 19.Bxa6 and 19.Bf6. I
was so concentrated on creating chances to avoid the draw that I forgot that
my opponent had serious threats. I was mainly analysing 19.Bf1 and 19.Ba3.} (
18... Bg6 $1 {I rejected this move because after} 19. Nd6 Nb4 20. Nxb7 $6 {
I couldn't see anything better than a repetition of move after} Nc2 ({Turned
out that I had} 20... Rfb8 $1 21. Na5 Bb6 22. a3 Nc2 $15) 21. Rab1 Nb4 {
In the end White should probably play 19.Ng5.}) 19. Bxa6 $6 {Eric was more
attuned to the truth of the position than me and took a long time deciding
between the two very tempting options 19.Bxa6 and 19. Bf6. He correctly
assessed that the latter would give me nice compensation, but didn't calculate
deeply enough the game's continuation.} (19. Bf6 $1 {was still indeed the best
move} gxf6 20. Nxf6+ Kf8 21. Nxh5 Bb8 $1 22. Bf1 Be5 23. Rab1 Rd2 24. a4 Rad8 {
with decent compensation since I will swap the knight coming to f4.}) 19...
Bxe3 $1 {Before Eric played 19.Bxa6?! I had already worked out the winning
continuation that happened in the game. I went from fearing the move once I
saw it to actually hoping for it.} (19... Nb4 $2 20. Bxb7 Rab8 21. Nc5 $1 $16 {
and the hanging bishop on h5 saves White.}) 20. Bxb7 $2 {Played with tempo.
Perhaps Eric should have recalculated the whole line before committing to it;
what an extra move can do for a player's vision. It was still not too late to
bail out with:} (20. fxe3 Rxa6 21. Nc5 Ra7 22. Nxb7 Rd2 $11) 20... Bxc1 21.
Bxc1 (21. Rxc1 Rxa2 $19) 21... Rd1+ 22. Kh2 Rb8 23. Bxc6 Rc8 {[#] Oops, Black
regains a piece! My opponent clearly made some kind of inexperienced tactical
mistake. When you have a rook pinned on the first rank, this should be a
warning sign to calculate more deeply than usual since some unexpected tactics
often occur in those circumstances.} 24. Bb5 Rcxc1 $19 25. Rxc1 Rxc1 26. a4 {
The two connected passed pawns look a little scary, but I am in time to stop
them.} Bd1 (26... Bg6 $5 27. f3 Bxe4 28. fxe4 Rb1 29. Bc4 Ra1 $19 {is a clever
way to put White in some kind of Zugzwang. The real problem with White's
position is the poor position of his king. editor - If White's K was on e3
he'd have decent compensation, and if the K was on b4 he'd be winning.}) 27. b4
(27. Bc4 Ra1 (27... Bc2 $5 28. Nc5 Bxb3 $19) 28. Nc5 Ra2 $19) 27... Bc2 $1 (
27... Rb1 $2 28. Nc3 $1 $17) 28. Nd2 (28. Nc5 Rb1 29. Na6 Be4 $19 {White can't
move.}) 28... Rd1 29. Nc4 Be4 $1 30. f3 Bd5 31. Ne5 (31. Ne3 Rb1 32. Nxd5 exd5
$19) 31... Rd4 {[#] The simplest. I just had to make sure I was in time to
stop the pawn after the bishop trade.} 32. Nd3 Bc4 33. Bxc4 Rxc4 34. b5 (34. a5
Rd4 35. b5 Rxd3 {Follow by putting the rook behind the most advanced passed
pawn.}) 34... Rxa4 35. b6 Ra1 36. b7 Rb1 37. Nc5 {White is pinning his hopes
on some kind of geometry; the f8, e5 and f6 squares are all mined. However,
after Black's next, White will be left only with K moves.} Rb2 $1 {The
cleanest, White is deprived of g4.} 38. Kg1 Kh7 39. Kf1 Kg6 40. Ke1 Kf5 41. Kd1
e5 42. Kc1 Rb6 {The rook creates an impenetrable barrier, allowing the Black K
to mop up the kingside pawns.} 43. Kd2 Kf4 {The critical moment of the game
was very strange. It seems that 19.Bxa6 should have worked under normal
circumstances, but for some concrete reasons it didn't.} 0-1
..