Sac, Sac, Mate

S. Cleto (1906) – J. Repa (1991), Abe Yanofsky Memorial 2011
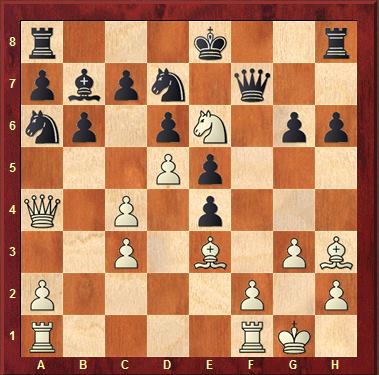
White clearly dominates the position and even if he does not manage to break through immediately, his advantage will persist. Nevertheless, he can end the game immediately.
Click below for a hint:
Spoiler: Highlight to view
Open up files against the opponent’s weak monarch.
Click below for the solution:
Spoiler: Highlight to view
1. f3! (f4, with the same idea, was equally good.) exf3 (allowing White to capture on e4 is hopeless. 2. Rxf3! Qxf3 (Qe7 was even worse after the simple 3. Raf1.) 3. Nxc7+ Kf8 4. Qxd7 Qxe3+ 5. Kh1 Qf3+ 6. Bg2 Qf7 (necessary as Ne6+ followed by Qg7# was threatened.) 7. Rf1 Qxf1 8. Bxf1 and Black should resign before anyone sees him playing this position. Despite the level material situation, the White queen is too active: she cuts off the Black king on the back rank, creating numerous mating threats and discoordinating the rooks. After 8. … Nxc7 9. Qxc7, White can simply use his last remaining minor piece in harmony with the queen to creative decisive mating threats e.g. Bd3 Bg6 or Bh3 Be6.
(after the move played in the game: 2. Rae1, White maintains a decisive advantage, though it is harder for him to break through. Though after a few inaccuracies from his opponent, he still managed to take the game in spectacular fashion. 2. … Rh7 3. Bg4 e4 4. Bd4 h5 5. Rxf3! (finally!) hxg4 (exf3 6. Nc5+ most likely didn’t appeal to Black. Regardless all lines are hopeless for him.) 6. Rxf7 Rxf7 7. Rxd4 Re7 8. Bf6)